IBM의 developerworks에서 발췌 했습니다.
=================================================
Installation
To install the current release of Git, you can use vendor-supplied
packages that ship with your Linux distribution, or you can manually
compile it from the latest stable snapshot. I recommend downloading a
tarball containing the most recent stable snapshot of the Git source
code; the release as of this writing is v1.4.0. You can find a link in
the Resources
section below.
Once you have this tarball, make sure that you have the
proper dependencies for the initial installation. Your system must
contain the following packages, along with their respective development
headers:
- zlib
- libcurl
- libcrypto (OpenSSL)
- rsync (version 2.6.0 or higher)
Once the dependencies are met, you can begin building
your initial Git installation. The process should be familiar to most
developers who have used Linux previously. Start off by untarring the
package, using the appropriate unpacking method for your download:
$ tar -jxvf git-1.4.0.tar.bz2 |
or
$ tar -zxvf git-1.4.0.tar.gz |
Then change to the appropriate directory and use the make
command. (Note that the directory name will depend on the date of the
snapshot you’ve downloaded.)
$ cd git-1.4.0/ |
You will be prompted for the sudo password for
installation to continue. Now you should be ready to begin using the
Git tools.
Obtaining the latest kernel source tree
When using Git to manage source code repositories, there are two main
ways to get started. You can take a local directory of existing code
and make a repository from it, or you can mirror a repository that
someone else publishes.
For the purposes of this article, you’ll obtain a mirror
of Torvalds’ published Git repository. The following command will create
a Git repository directory called linux-2.6. This directory will
contain a hidden dotfile directory called .git/.
$ git-clone \ |
This step will take a long time, as Git is transferring
the kernel source (which is hundreds of megabytes in size) from
kernel.org to your local machine. The output will look rather
unintelligible, and should scroll by relatively quickly if you have a
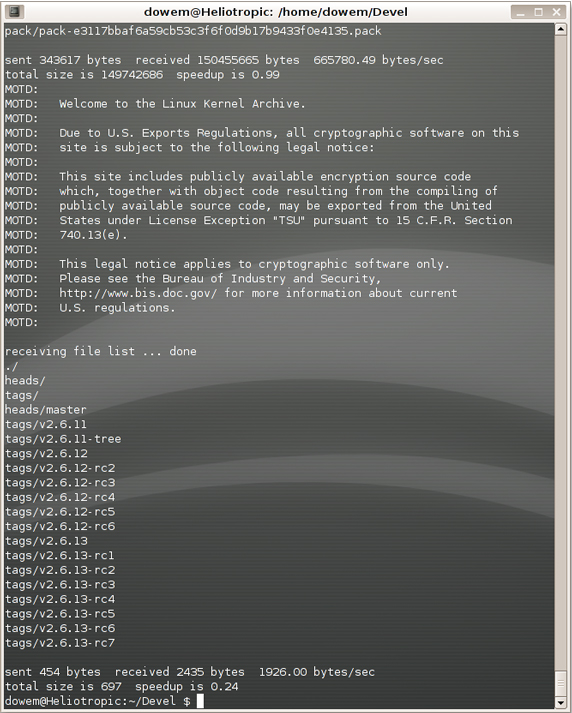
fast Internet connection. Your output should resemble Figure 1.
Figure 1. Output produced when downloading the kernel source tree
Now change into the directory containing the newly downloaded kernel:
$ cd linux-2.6 |
At this point, you should have a working Linux 2.6
repository on your local machine! Now on to basic operations with this
repository.
Updating your local Git repository
Normally when using Git, you can assume that your repository is a
little bit behind what is located on kernel.org. So you would typically
begin by updating your repository to the latest upstream kernel tree.
This process is sometimes referred to as a fast-forward merge.
Strictly speaking, you don’t need to perform this now, as you just
installed your repository and it should not be out of date. But it
doesn’t hurt to check just in case:
$ cd linux-2.6 |
If successful, you should see output that looks similar
to the following:
receiving file list ... done |
If your repository was not up to date, you would see some
content transferred to your local machine over the network.
Checking files out of the repository
You’ll need to check out files from the Git repository (the stuff in
the hidden files) into the working directory to begin your hacking. The
following command will place unhidden directories with the Linux source
code in the current directory:
$ git-checkout |
If you ever want to overwrite any of your local
modifications, you can do another checkout with the -f
option to bring you back to a clean slate:
$ git-checkout -f |
At this point, you should see the familiar Linux source
code directory structure in your current working directory, and you can
begin making modifications to the source.
Modifying existing files
You can now modify any file you choose. As a simple example, you’ll
modify something in the docs directory: you’ll add a message that will
be easily recognizable later. To make my example easier to follow, I
chose not to modify code, but you are welcome to dive in and rewrite the
entire kernel subsystem if you are so inclined.
First, let’s open a file in an editor:
$ vi ./Documentation/ManagementStyle |
Obviously, I’m using vi here, but you are, of course,
free to use whatever editor you prefer to get the job done. In editing
the file, I added a line before the first paragraph, as follows: “Eli
shall be in charge of managing sandwich consumption. See
Documentation/Sandwiches for more.”
If you are satisfied with the alterations you have made
and you feel you are ready to make them a permanent part of your
repository, you simply need to check in your changes using the following
command:
$ git-commit Documentation/ManagementStyle |
You will be prompted to supply a commit message,
which is a user-generated comment that will help other developers (or
you, later) understand what exactly the change you just implemented did.
In my case, the commit message was a sentence describing the alteration
I had just made to the documentation.
If you would like to check the status of your work so
far, you can execute git-log to view the history of your
local repository (which inherits the information of the repository that
you cloned). Your commit message should be at the top of the log.
Adding or removing files
But wait! We never added a Documentation/Sandwiches file, so you need
to add it to the working directory and tell Git about it when you’re
done. I created the file I wanted to add using the echo
command, since this is a simple example. Again, you can use whatever
means you prefer.
$ echo "Turkey is superior" > Documentation/Sandwiches |
Now that you’ve added a file, you need to make Git aware
of this change by adding it to Git and then committing the revision. You
can perform these tasks by executing the following commands:
$ git-add Documentation/Sandwiches |
If you had added multiple files, you could continue
listing them after the git-add command on a single line, as
you need not add them one at a time. If you have to remove a file,
there is no special command like git-add; you just remove
the file, then commit.
Now is a good time to check in on your git-log
to ensure that what you have done so far has been correct. This time,
you will use the -p option to see the log in individual
patch format.
$git-log -p
Creating diffs
Finally, you will want to generate a text file containing only the differences between your modified source and the original. This file is typically created with the diff utility, and is called a diff. The diff helps you create a patch file, which is the preferred way of sending code submissions to many open source projects. For more about diffs, see the links to Kernel.org in Resources below.
What else can Git do?
You can use Git to manage local repositories without mirroring
someone else’s work. For instance, if you would like to use Git to
manage your own personal contributions to an open source project, you
can begin by making a Git repository from a project snapshot.
Assuming you have a standard release tarball named
release.tar.gz, you can create a local Git repository by issuing the
following commands:
$ tar -zxvf release.tar.gz |
You may see messages stating saying that Git is
“defaulting to local storage area.” These messages are normal and
indicate that you have a Git repository in place.
You’ve now initialized the working directory, and you
should see a new directory, .git, within the project directory. To
inform Git that you want to track each of the files in the project
directory, issue the following command:
$ git add . |
Finally, commit the monitored files to the repository
with the following command:
$ git commit -a |
Once again, you will be prompted for a commit message.
From this point, you can work within your Git repository using all the
functionality provided by Git, such as branching for experimental
features, bisecting to track down regressions, and the doing the usual
revision history functions.
For more information on managing branches and other
interesting features of Git, check out the excellent Git tutorial at
Kernel.org.